Friday, November 25, 2011

~Santa's little elf and vintage decoration tutorial~

That's how I'm feeling, like Santa's little elf!!

Inbetween the usual routine of life, and then some, I am painting and glittering up a storm,

and having lots of fun getting things finished up for the Fieldstone Christmas market next weekend.


christmas~vintage~handmade

doesn't get much better than that peeps!


here's one of the vintage style decorations I've been working on today


I usually start out with a general idea in mind, but then my decorations evolve as I go along, more fun that way!

If you'd like to make your own here's how:

VINTAGE STYLE CHRISTMAS STAR

Okay,  pump up the Christmas music. I'm generally a not-before-December-1st gal, but if I'm gonna be doing Christmas all day, I need Christmas music!

First of all you need large stars. These ones were from Michaels, they actually came as a mini scrapbook kit so the holes were pre-punched. Handy. I don't have a photo of them before glitter, but they started out as stiff white cardboard stars. {I picked these up last Christmas but it should be easy to find similar stars, or you can make your own.} Chipboard stars would be awesome if you can find them large enough. These are around 9 inches across.


Spread them with craft glue and glitter them up. I used a small foamie to spread the glue, and then used a really coarse glitter here as I'm going for the vintage, vintage look.

Next you need to make your paper rosette. I have made dozens of these this year and they are so pretty. There are lots of good tutorials out there on how to make them, I hope to post my preferred method in a future post {ie. after market when I have a bit more time:-)}


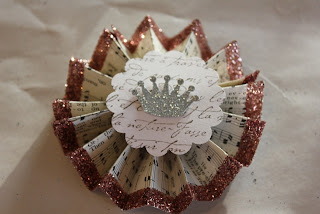
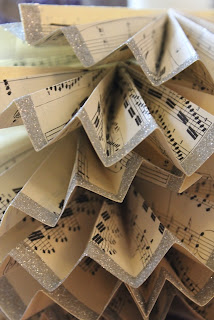
Quick tip: glitter the edges of the pages BEFORE you fold them. I used an old hymnal for these, but you could also use dictionary pages.


On the rosettes I used a much finer glitter, this one is rose quartz from the Martha Stewart line. It's a much gentler color than it looks in the photos. My rosettes are 3.5 inches across to fit snugly in the star.

Be sure to secure the back. I like punches, can you tell?


Now you want to finish off your rosette. I punched white scalloped circles from white cardstock and stamped them with my very most favorite french script stamp.


Top it with a punched crown from glittered cardstock. I picked up my glittered cardstock in a couple different places : scrapbook stores, Michaels and even a $ store {look in the scrapbooking section}.


Now glue your rosette to the star - I use my trusty old glue gun for all the glueing.


Final step is to create the hanger. Take a silver pipecleaner and wind it fairly tightly around a pencil, like this:


Loooove me some sparkly!

Then attach the twirly pipecleaner to the star by twisting the ends through the punched holes, and securing at the back with a dab from the glue gun. It would probably stay without the glue. You can adjust the twirls and stretch them out a little if you like.


Ta-da, you have a lovely vintage styled christmas decoration, which is great as a stand alone gift or on the tree.


Let me know if you have questions about any of the steps and happy glittering!!

Enjoy the weekend,


Saturday, November 19, 2011

~cutest stocking hat evah~

I just could not resist reposting this photo, is this not the cutest picture ever!!


it just makes me smile:-)

and smile some more...

check out Kids' Precious Couture etsy store, all the photos and hats are super cute!

Happy weekend!
Tracey


Tuesday, November 15, 2011

~pinterest passion and a little luggage inspiration~

Okay, I confess, I'm addicted to Pinterest! I was "invited" to sign up a while back, but didn't activate my account until the summer; somehow I just knew how it would be:-) I lose myself in all these gorgeous images and time just flies away. Honestly it does. So now Pinterest is my sweet "reward" time, when I have a few carefree minutes to dream away!

So how do you explain what it is about Pinterest that is so captivating? For those of us who like to create and repurpose and stage and just enjoy beauty in even simple objects, it is pure bliss to lose yourself in this feast of visual images.

Plus it is an awesome way to organise your inspiration photos in a way that makes them easy to find at a future date.

I currently have relatively few boards, for two reasons. One, this is my carefree time, I don't want to feel the pressure to have all my interest boards up pronto, I pin to them when I want to; they are a work in progress. And two, there are so many images out there I try to narrow it down to photos that I really really love, they have to have great subject matter and still be awesome photos.

Many of you will know just what I'm talking about! If you have not yet taken the Pinterest leap email me for an invite, and be prepared for time to fly by!

So here's some vintage luggage inspiration via pinterest, swoon!


gorgeous outdoors vignette, love those lacy ruffles in the corner


awesome storage


this is how I use mine, stacked up in the hallway, wish I had that many, my stack is just 5 cases high!!


this is on my to-do list, paint a suitcase that's not in great shape


so romantic...


party time, use them for height and interest on a table setting


whimsical and totally unique


is there a Dr in the house??


a few of my favorite things...vintage luggage, galvanised flower bucket, glass cloche, gorgeous lilacs


Hope you enjoyed my round up of vintage luggage! How do you use your vintage luggage? Do you store things in your cases?
~Tracey~

to view or follow my pinterest boards click here

all images via pinterest

Saturday, November 12, 2011

~a vintage Christmas~

I'm having a lot of fun making up some vintage styled decorations for the Fieldstone Christmas market . I have a million ideas I would like to make, but had to narrow it down to just a handful given the time I have available.


So here's a sneak peek....

vintage sheet music


rustic grainsack style ruffled stockings


and of course glitter, glitter, glitter


There is glitter all over my home and all over me!! Love the stuff!!

what are you making for Christmas?

Tracey


Monday, November 7, 2011

~autumn flavors - yummy carrot cupcakes~

Don't you just love the unique treasures of autumn?
the colors of the leaves
the crispness in the air
decorating with pumpkins
 steaming hot choc or apple cider after school, and....


~the yummy fall comfort food!!~

Some of my favorite recipes are the ones I pull out in fall. There is nothing better than coming home to the aroma of the slow cooker bubbling away, or the smell of cinnamon and spice in the air.

Today I've just got to share this most awesome recipe for carrot cupcakes. Carrot cake is a big winner in our home, but my regular recipe is pretty labor intensive, so it doesn't get made all that often.


Not so these carrot cupcakes, which are super quick and easy, and really more like a muffin. I love that they are choc~full of carrot and apple and raisins, and not too heavy on the sugar. The icing really makes them fab and they are great for lunchbags. I keep mine in the fridge so the icing stays nice and frosty.


{By the way, does anyone know why the carrot turns green once it is baked? Sunflower seeds do the same thing.}


This recipe comes from Joy of Baking

Yummy carrot cupcakes

2 cups flour
1 1/2 teaspoons baking soda
1/2 teaspoon salt
1 1/2 teaspoons cinnamon
4 large eggs
1 cup sugar
1 cup canola oil
2 cups raw grated carrots
1 cup grated apple
1 cup raisins
1/2 cup pecans of walnuts (optional)

Preheat oven to 350 degrees F
Whisk together flour, baking soda, salt and cinnamon
In another bowl whisk eggs, sugar, oil until slightly thickened ( I did this in my kitchenaid)
Fold in carrot, apple and raisins
Spoon into lined muffin cups and bake for 20 mins until baked through
(use the toothpick test)
Remove from oven and cool completely on a wire rack

Cream Cheese Frosting

1/4 cup butter, room temp.
1/2 block cream cheese
1 1/2 icing sugar
1 teaspoon vanilla extract

Beat butter and cream cheese until smooth and creamy
Beat in icing sugar and vanilla
Pipe or spread on top of cupcakes
Cover and refrigerate
(This is half the quantity of the original recipe, but was more than enough to ice the cupcakes)

YUM!!!


Enjoy!!
Tracey

Sunday, November 6, 2011

~french farmhouse giveaway~

Be sure to check out this awesome giveaway over at Junk to Joy, it's full of all kinds of wonderful french treasures...


hope you're having a happy weekend!
Tracey
Related Posts Plugin for WordPress, Blogger...