Showing posts with label shabby. Show all posts

Thursday, April 4, 2013

~blossoms in a bucket~


~Hello friends~

IMG_5144


Well our spring break is truly over and it’s back to early mornings and schedules and work!

We were blessed with an incredibly long warm patch, blue skies and sunshine, and with that the trees all burst into blossom.


IMG_5120


Of course I had to bring some of that blossom goodness inside,
 so off we went, clippers in hand.


IMG_5114


Sadly I don’t have my own blossom tree, but I had scouted one out on a vacant lot, 
so I cajoled my youngest to come along for the adventure, 
just in case it included climbing fences.
Ahem!

Which it didn’t. 
Pity.
 I love an adventure:-)


IMG_5141


We came home with armfuls of gorgeous spring blooms, and they were pretty white blossoms to boot.

So I plunked them in a big old bucket on my chippy farmhouse table.


IMG_5131


And then I clicked away....


IMG_5124


Sunshine and spring blossoms, doesn’t get much better than that.


IMG_5139


There was enough left to fill up a couple aqua mason jars too, pretty!


IMG_5164


So now it is raining again, and it seemed like the perfect time to post some pretty spring pictures.


IMG_5076


{Oh yes, and there was a fair bit of this going on around here too!}


IMG_5184


Hope you’re seeing some signs of spring where you live too!

Tracey

follow me on fb here and pinterest here
~links also on the sidebar~


IMG_5124

Monday, April 1, 2013

~raggy bunting love and how to~


Hello friends,

IMG_4979


I have been busting to show you my raggy bunting, 
you might have seen a peek over on my fb page here or my instagram {raggygirlvintage}.

I have to warn you, it is highly addictive.

 And it will leave threads all over the sofa.
 And you!!

I have been in love with bunting forever, I showed you some mini white bunting here…


IMG_4797


I also love to make it in ticking and vintage florals. 

Hanging bunting gives that yummy vintage, handmade feel.

I wanted to make a less formal raggy bunting, 
I’ve seen similar bunting inspiration floating around.
 Anthropologie even has a version too.

This bunting is hot right now at weddings and baby showers. 
It makes an awesome backdrop for photoshoots, across an arbour, or tied across the front of a table.

IMG_4934

To start I pulled out my stash of aqua and white sheets. 

It’s super easy peeps.

 Just rip strips of varying lengths, mine were probably 1.5”-2” wide.
 Then tie them along a length of sturdy twine.
 Make sure you use tidy knots so the strips hang downwards.


IMG_4909


I made mine 3 feet long plus extra twine for hanging, and it took me around 2 hours to make.

I have it draped over one of my doors here.

IMG_4940


Can we say LURVE…..

I just couldn’t stop!!

Next up I knew I wanted ~all white, lacy, ethereal, romantic~

 So this time I ripped up white muslin and pulled out my stash of vintage lace.


IMG_4990


My, did this ever use a ton of lace.

IMG_4981

Lace is just soooo pretty.

IMG_4982


This bunting has headed over to The Passionate Home ready for spring and summer weddings. 

It is so pretty but there is only so much bunting one can hang with 3 guys in the house!

IMG_4979

Now I realise this may not be everyone’s taste, but it’s a fun and simple way to add a whimsical touch to your next special event, or to your home decor just because Smile

Next up vintage linens…just gotta make that first rip, I find it really hard to rip up vintage linens, how silly is that!

A couple of my instagram gals have already been inspired to make their own version, why not give it a go??

Hugs,

Tracey

IMG_4986

IMG_4931

Saturday, January 14, 2012

~making french decor bottles~

Hello peeps,

I wanted to show you a really easy and effective way you can transform ordinary thrift store glass bottles into elegant french bottles. I had fun making these ones up for a vintage market. 


IMG_0436-1


I don’t have step-by-step photos for you, but I’ll describe how I did it.

1. Keep a look out for nicely shaped glass bottles on your thrifting adventures. I especially like bottles with a squareish shape, but you can use any really. Give them a really good wash, I run mine through the dishwasher.

2. Make friends with someone who has an awesome vinyl cutter or buy yourself an awesome vinyl cutter. As I don’t own an awesome vinyl cutter I went the friend route! Decide what you want and pick out your fonts, sizes etc. I chose eiffel towers, fleur de lis, paris…..You could also use premade vinyl stickers if you find some you like.

3. Apply the vinyls to the bottles.

4. Wind jute tightly around the bottle neck and secure with a knot. I also added some wrinkled seam binding to some of mine for a more romantic look.


IMG_0435-1


And that’s it, they look great with a couple of different sizes grouped together, or a single bottle on a mantel, and they also make a fab gift!


IMG_0436-2


Have a great weekend!

Tuesday, December 6, 2011

~fieldstone : fabulous, fun, freezing....~

Well peeps, I would have had this post up earlier if my fingers weren't frozen...

Just kidding, kinda:-) It has seriously taken me several days to thaw out!

Fieldstone Christmas market was great, you have to really admire us northern gals who set up an outdoor market in close to freezing temperatures!

But then I especially admire the wonderful shoppers who came out to shop the market, a big thanks to each of you who stopped by to say hi.

We had a great cross section of vintage and handmade vendors, I'll post the link once the "official" photos are up. For now, here's a few shots of my wares.


Good sellers this time round were vintage kiddie skates, burlap garland,
small chalkboard frames


vintage sheet music ornaments


my stencilled glass dome servers


as well as my vintage style white trees, they were so much work they deserve a post of their own soon!


Have you ever made white trees? I'd love to know!


Tracey

Sunday, October 2, 2011

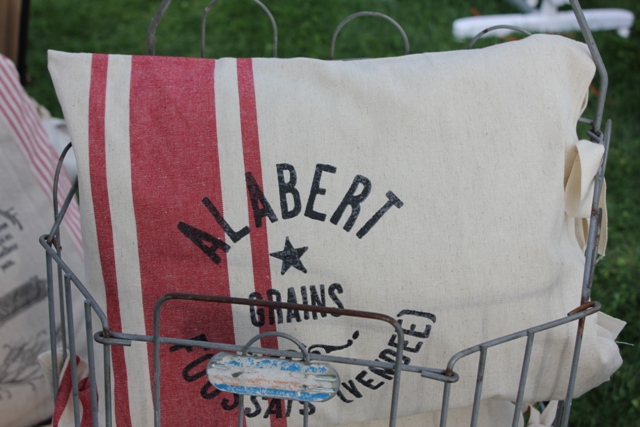
~french grainsack style pillow~


I made up some french grainsack style pillows for a recent market


and they were such fun I just kept going!

~so now I'm listing a couple in my etsy store~


don't you love my vintage wire shopping cart, one day I'd like to make a pretty liner for it

anyways, back to the pillows, they have
barn red stripes front and back and a french graphic in black on the front


side ties, just because that's how I pictured them made up


they're a nice heavier weight fabric

$25 including the 12x16" insert

available at my raggygirl etsy store

i love them so much i'm keeping one for myself!!

Tracey


Friday, September 9, 2011

~fieldstone vintage market~

if you live anywhere near Vancouver don't miss out on the


 coming up in just two short weeks

if you made it out to the Old School Market, this market is being organised by the same dynamic duo, Rachel and Lily of Birch and Bird...

they have teamed up with Bakersview EcoDairy to host a large outdoor market

with 50 vintage vendors and local artisans, including moi

~raggygirlvintage~


i went and checked out the venue and it is fab, horses grazing in the field behind, gorgeous view of Mt Baker, nicely laid out "field" with walkways and grassy patches

~and of course the sun will shine all day~

click on the link above (click the bottom half of the poster - blogger gremlin), or click the link on my sidebar for more details

it's a family friendly venue, but you'll also find information there on local hotel deals and shopping spots if you're making it a girl's weekend:-)

 it will definitely be worth it peeps, see you there!!

Tracey

PS. For the Washington gals, the market venue is just north of the Sumas border crossing


Monday, August 22, 2011

~grandpa's chair~

i found this old, old chair at a garage sale, it had belonged to the seller's grandpa

i tried to convince her to keep it, really i did

{drat, can't find the before photo}

anyway, it was a very old, solid wood chair, and very heavy!

i couldn't decide whether to keep it natural or paint...

but the peeling varnish had me a little concerned

so paint it was


lightly sanded off the loose varnish, and gave it just one coat of old white chalk paint


the brown of the varnish kinda seeped through as the paint dried, but that's okay, makes it look more authentic


gave it a light sanding here and there and finished with a layer of clear wax


love how the seat is molded from years of use!
{you can see the brown from the varnish seeping through on the seat}


then I had to play around a little of course


white roses from my garden in a favorite white pitcher


{these roses smell divine}


~and a little more ~


that is a child's vintage nightgown laying on the chair


Tracey


Related Posts Plugin for WordPress, Blogger...