That's how I'm feeling, like Santa's little elf!!
Inbetween the usual routine of life, and then some, I am painting and glittering up a storm,
and having lots of fun getting things finished up for the Fieldstone Christmas market next weekend.
christmas~vintage~handmade
doesn't get much better than that peeps!
here's one of the vintage style decorations I've been working on today
I usually start out with a general idea in mind, but then my decorations evolve as I go along, more fun that way!
If you'd like to make your own here's how:
VINTAGE STYLE CHRISTMAS STAR
VINTAGE STYLE CHRISTMAS STAR
Okay, pump up the Christmas music. I'm generally a not-before-December-1st gal, but if I'm gonna be doing Christmas all day, I need Christmas music!
First of all you need large stars. These ones were from Michaels, they actually came as a mini scrapbook kit so the holes were pre-punched. Handy. I don't have a photo of them before glitter, but they started out as stiff white cardboard stars. {I picked these up last Christmas but it should be easy to find similar stars, or you can make your own.} Chipboard stars would be awesome if you can find them large enough. These are around 9 inches across.
Spread them with craft glue and glitter them up. I used a small foamie to spread the glue, and then used a really coarse glitter here as I'm going for the vintage, vintage look.
Next you need to make your paper rosette. I have made dozens of these this year and they are so pretty. There are lots of good tutorials out there on how to make them, I hope to post my preferred method in a future post {ie. after market when I have a bit more time:-)}
Quick tip: glitter the edges of the pages BEFORE you fold them. I used an old hymnal for these, but you could also use dictionary pages.
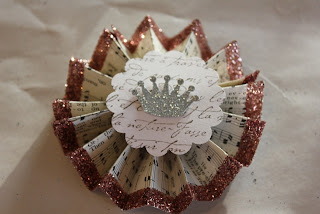
On the rosettes I used a much finer glitter, this one is rose quartz from the Martha Stewart line. It's a much gentler color than it looks in the photos. My rosettes are 3.5 inches across to fit snugly in the star.
Be sure to secure the back. I like punches, can you tell?
Now you want to finish off your rosette. I punched white scalloped circles from white cardstock and stamped them with my very most favorite french script stamp.
Top it with a punched crown from glittered cardstock. I picked up my glittered cardstock in a couple different places : scrapbook stores, Michaels and even a $ store {look in the scrapbooking section}.
Now glue your rosette to the star - I use my trusty old glue gun for all the glueing.
Final step is to create the hanger. Take a silver pipecleaner and wind it fairly tightly around a pencil, like this:
Loooove me some sparkly!
Then attach the twirly pipecleaner to the star by twisting the ends through the punched holes, and securing at the back with a dab from the glue gun. It would probably stay without the glue. You can adjust the twirls and stretch them out a little if you like.
Ta-da, you have a lovely vintage styled christmas decoration, which is great as a stand alone gift or on the tree.
Let me know if you have questions about any of the steps and happy glittering!!
Enjoy the weekend,
Tracey
linking up to Feathered Nest
Funky Junks SNS - handmade gifts
Frugal Friday
Simply Christmas
Holly Bloggy Christmas
linking up to Feathered Nest
Funky Junks SNS - handmade gifts
Frugal Friday
Simply Christmas
Holly Bloggy Christmas


2.png)


.jpg)


.JPG)


15 comments:
How beautiful! Looking forward to the market!
Such a lovely ornament, Tracey! See you next weekend :-)
Victoria
Hi Tracey,
You are an elf for sure!!!! You've been busy, busy, busy......tis the season!
Love your ornaments
hugs
Sissie
Oh my gosh.......GREAT minds really DO think alike!!!!! I made some exactly like these for TPH this year!!!
Happy glittering!
Xojanis
These are beautiful. Thanks so much for sharing how you made them. Hope the show goes well!
So pretty!!
These are beautiful - I love the glitter edge on the rosette and also how you twirled the pipe cleaner to hang the stars!
Such a pretty ornament.
I'd love it if you could share this over on my Simply Christmas Inspiration Party at http://shabbyartboutique.blogspot.com/2011/11/inspiration-friday.html
I love these! So pretty! I so wish I lived closer so I could go to the Fieldstone Christmas Market!
Good Grief...I might as well just chuck all my stuff...these are amazing!
Might as well just take a nap.....Cuz no way am I going to do well with you in the tent!
Amazing job!
See you soon!
I love this. I just made a few of those flowers for a banner, not posted yet. But I didn't think of glittering the edges. Looks great! Lisa
These are fantastic! Cannot wait to see you again on Saturday...sunshine, woo hoo!!! ~Lily
I love, love, love that star! I am so bummed that I'll miss the market. Make sure you have tons of fun and that the weather is sunshiney. Oh and may you make lots of sales ... but knowing your stuff, it will sell like hot cakes!!! Have fun!
Wow - you've done a great job. Looks fantastic!!!
Hugs
Tine
Love them! And I love your vintage style. Vintage thingies make me happy! :-)
Post a Comment
Thanks for stopping by - I love reading your comments and getting to know you a little better!!