Tuesday, December 27, 2011

~week-after-Christmas~

Hello peeps, how was your Christmas?


Ours was lots of family, food and fun!

Here are some photos of my handsome crew, it doesn't seem all that long since they were just toddlers around our tree...


So now we're enjoying some downtime this week before the new year begins.
I'm enjoying  lazing sleeping in, catching up on my favorite blogs, browsing magazines and spring cleaning my closets. In that order!!
Which might sound like work, but I really feel better when my home is somewhat in order before it's back to our crazy schedule.


And I'm starting to think about what I'd like to shoot for this coming year, I'm not a big fan of resolutions, but I like to have some goals/projects in mind. Are you thinking about your year ahead?
Hugs,
Tracey


Wednesday, December 21, 2011

~christmas~


Isn't Christmas the funnest time to "fluff"

smiles,
Tracey

Tuesday, December 20, 2011

~simple enamelware centrepiece~

Well I'm back online after 3 days of computer woes, I was able to visit my bloggy friends from my ipad, but have all my photos stored on our main computer.

So with just five sleeps to go I wanted to show you the really simple centrepiece I put together for our kitchen table.


I picked up this awesome enamelware sometime this past year, and when it came to market time I pulled it out of my stash, knowing it would be awesome to use on the table. It's a shallow rectangular shape and just perfect as a centrepiece.


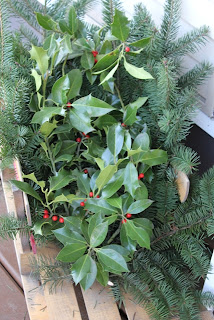
Filled it with a bunch of cut greens, just regular fir clippings. I'll probably have to refresh them before Christmas, they dry out really fast inside the house. Oh, and a few sprigs of fresh holly of course!


Tucked in some shiny red ornaments I've had for years, as well as some cute white pinecone ornaments. I'm noticing a few touches of red popping up in my Christmas decor this year. We have the kid's uber-colorful tree next to this table, so the red fits in just fine here!

We started that tradition some years ago, the kids just have SO many decorations so we put up a fake tree in early December and they get to decorate it however they want. Then later in December we cut a family tree for the living room, which Mamma has a bit more say in decorating:-)
{This year I have been really big on family involvement however, so decorating it was a combined effort....}

Anyway, back to the centrepiece!


Tucked in some candles!
I like these plain white candles from Target, they are truly white, fragrance-free and reasonably priced. They come in a set of 3.


And there you have it, simple but christmasy.


linking up to Nifty Thrifty Tuesday

Tracey

Friday, December 16, 2011

~3 things I'm loving this Christmas~

here are a few of the things I am loving this year

#1. sweet little flocked forest deer


Yes, that would be sunlight streaming in, it was worth the shadow just to have the sun shining!!


#2. Vintage and vintage-style decorations


and #3. red and white baker's twine, love.love.love. it


what are you loving this year?

Tracey

Tuesday, December 13, 2011

~vintage style white trees~

Made lots and lots of white trees this Christmas, they look soooo pretty grouped together.


dusted them up with some sparkle


some of them were put into shiny mercury glass pots


tucked them in with white feathers and shredded vintage sheet music


The smaller ones I glued to this awesome cardstock to make miniature woodland scenes


And as for this cutie, this one had to stay home with me! Isn't this the cutest container ever, it's apparantly a gravy server.


Tracey

Monday, December 12, 2011

~christmas decorating with a red toolbox and rusty funnels??~

Like many of my blogging friends I am aspiring to a simple Christmas this year, and shopping my home first.

I especially like to keep things natural outside on the porch, and always cut tons of greenery and holly.

Rule #1
Always cut way more than you think you will need, especially holly!


So this year I pulled out this old bright red Husky toolbox, I picked it up for $2 at a garage sale in the summer, but as it had not yet been put into use I nabbed it for the porch.

Tucked in a great vintage funnel with red trim...


and filled it up with all different kinds of greenery


I like the pop of red on my front porch!


And here's another old funnel I filled up


Funnels are such an awesome shape for filling up and decorating with!

Here are a couple more shots on the front porch.


vintage sled and mailbox


and a few more pops of red


berries in white enamelware, those are snowshoes in the background


candle lantern and pinecones

hope you enjoyed my natural porch decorating, don't worry I saved some sparkly for inside!!

linking up to Nifty Thrifty Tuesday
Funky Junk SNS

Tracey

Friday, December 9, 2011

~vintage Christmas inspiration from Fieldstone~

As promised, here's the link to photos of some of the wonderful wares at Fieldstone, hope you gain some Christmas inspiration browsing through them:)

I love decorating with vintage ornaments, and am really enjoying all the creative handmade ornaments that are showing up this Christmas. I'll be showing you a few more of the vintage themed ornaments I made this year very soon! Promise!


shiny vintage ornaments, isn't this a neat way to display them? I also like them heaped in a big ol' tarnished silver bowl.


handcrafted woollen stars and balls
click on this link to see more : Fieldstone Christmas Market


 I just went out clipping more greens and holly, and tomorrow we plan to cut our tree and do some baking.
'Tis the season!

If you'd like to see some of my simple porch inspiration with greens and holly from last Christmas you can read about my
 christmas decorating on the porch 101 posts

~the simple touch~
~decorating with greenery~
~using what you have~
~christmas wreath~
~white wednesday~

This year I'm using some of the same "props", but changing it up a little, so I'll post some updated photos once I'm done, it involves cool rusty funnels and an old red toolbox!

Hope you have some fun things in store this weekend!
Tracey

Tuesday, December 6, 2011

~fieldstone : fabulous, fun, freezing....~

Well peeps, I would have had this post up earlier if my fingers weren't frozen...

Just kidding, kinda:-) It has seriously taken me several days to thaw out!

Fieldstone Christmas market was great, you have to really admire us northern gals who set up an outdoor market in close to freezing temperatures!

But then I especially admire the wonderful shoppers who came out to shop the market, a big thanks to each of you who stopped by to say hi.

We had a great cross section of vintage and handmade vendors, I'll post the link once the "official" photos are up. For now, here's a few shots of my wares.


Good sellers this time round were vintage kiddie skates, burlap garland,
small chalkboard frames


vintage sheet music ornaments


my stencilled glass dome servers


as well as my vintage style white trees, they were so much work they deserve a post of their own soon!


Have you ever made white trees? I'd love to know!


Tracey

Friday, November 25, 2011

~Santa's little elf and vintage decoration tutorial~

That's how I'm feeling, like Santa's little elf!!

Inbetween the usual routine of life, and then some, I am painting and glittering up a storm,

and having lots of fun getting things finished up for the Fieldstone Christmas market next weekend.


christmas~vintage~handmade

doesn't get much better than that peeps!


here's one of the vintage style decorations I've been working on today


I usually start out with a general idea in mind, but then my decorations evolve as I go along, more fun that way!

If you'd like to make your own here's how:

VINTAGE STYLE CHRISTMAS STAR

Okay,  pump up the Christmas music. I'm generally a not-before-December-1st gal, but if I'm gonna be doing Christmas all day, I need Christmas music!

First of all you need large stars. These ones were from Michaels, they actually came as a mini scrapbook kit so the holes were pre-punched. Handy. I don't have a photo of them before glitter, but they started out as stiff white cardboard stars. {I picked these up last Christmas but it should be easy to find similar stars, or you can make your own.} Chipboard stars would be awesome if you can find them large enough. These are around 9 inches across.


Spread them with craft glue and glitter them up. I used a small foamie to spread the glue, and then used a really coarse glitter here as I'm going for the vintage, vintage look.

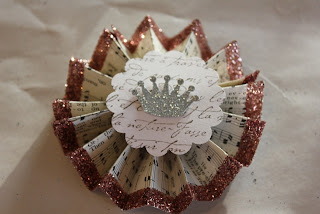
Next you need to make your paper rosette. I have made dozens of these this year and they are so pretty. There are lots of good tutorials out there on how to make them, I hope to post my preferred method in a future post {ie. after market when I have a bit more time:-)}


Quick tip: glitter the edges of the pages BEFORE you fold them. I used an old hymnal for these, but you could also use dictionary pages.


On the rosettes I used a much finer glitter, this one is rose quartz from the Martha Stewart line. It's a much gentler color than it looks in the photos. My rosettes are 3.5 inches across to fit snugly in the star.

Be sure to secure the back. I like punches, can you tell?


Now you want to finish off your rosette. I punched white scalloped circles from white cardstock and stamped them with my very most favorite french script stamp.


Top it with a punched crown from glittered cardstock. I picked up my glittered cardstock in a couple different places : scrapbook stores, Michaels and even a $ store {look in the scrapbooking section}.


Now glue your rosette to the star - I use my trusty old glue gun for all the glueing.


Final step is to create the hanger. Take a silver pipecleaner and wind it fairly tightly around a pencil, like this:


Loooove me some sparkly!

Then attach the twirly pipecleaner to the star by twisting the ends through the punched holes, and securing at the back with a dab from the glue gun. It would probably stay without the glue. You can adjust the twirls and stretch them out a little if you like.


Ta-da, you have a lovely vintage styled christmas decoration, which is great as a stand alone gift or on the tree.


Let me know if you have questions about any of the steps and happy glittering!!

Enjoy the weekend,


Related Posts Plugin for WordPress, Blogger...